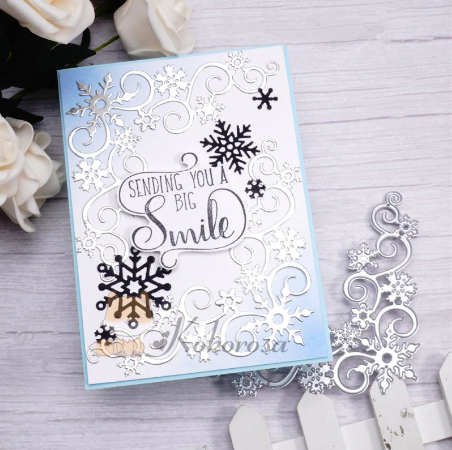
Tutorial: Snowflake border cutting die
Hello, friends~
Today, I’m going to share one beautiful snowflake pattern project with you. This card is created with the Snowflake Border Cutting Die. The rectangle border is decorated with different sizes of snowflakes. I will tell you how to make use of these snowflakes to create one interesting card. Let’s see some instructions about this project.
Step1: Die out three same rectangle snowflake borders.

Stpe2: Choose one frame. Cut out the snowflake pattern with scissors and the craving knife pen.


Step3: Color the snowflake patterns with blue marker pen. And we chose three different blue to color these snowflakes.

Step4: Adhere the blue snowflakes border to the white one using double adhesive tape.
Step5: Adhere the border with no snowflakes to the above one.
Step6: Use liquid glue to adhere the PVC paper to the frame together.
Step7: Add the sentiment to the card.
Step8: Stick the tape on the frame of the unfinished card previously
Step9: Pour out plastic foam ball to the card to create snowing effect.
Step10: Put the cover on the frame and cut out the extra paper. Now, we get one nice winter themed card!
If you want to see the complete making process, please click here.
Actually, there are nice snowflake themed cutting dies you can choose from kokorosa. You can get background boards, borders and single snowflake in our online shop. Next, I will recommend them one by one.
The first one is the 8 PCS Snowflake Set Cutting Dies. There are different types of snowflakes included in this dies set. You can combine different sizes of snowflakes on the card.
We also can choose the Snowflakes Border Cutting Die. Snowflakes border can be used to decorate your angels of card perfectly. You need to try it!


Leave a comment