Tutorials:Cycing and Natural Forest Projects
Hi~Crafty friends
We’re going to share two tutorials with you today! The theme of the two cards is enjoying life! Let’s see how to use life elements to make creative projects now!
The first project is created with Outdoor Cycling Cutting Dies. You will get two cutting dies in this set, including one cycling man and one cycling children pattern dies. It is suitable for sports, travelling and dad day themes. In addition, this cutting dies suits for beginners to make cards. The following instructions may help you create cards quickly.
Firstly, put cutting dies on the red cardstock paper using the cutting machine to die out the cycling pattern.


Then, we should do something about background. Preparing one yellow background previously. And adhering the forest pattern to the yellow background. There are some nice forest cutting dies you can choose from kokorosa studio.

Next, adhere the cycling man pattern to the card. In addition, add some cute clouds to create a more beautiful cycling scene.

The next card is created with Forest and Mountain Cutting Die. This set is super valuable because you will get four different dies in this set! Hope to inspire you after introducing the following steps.
Firstly, die out the four different patterns with cutting machine. The white paper will be suitable for us to colour the scene.

Now, we start to colour these patterns. Choose green to colour the forest using ink pad. Then use dark green to crate better scene of forest.

Next, colour one of dies with blue to crate one peace lake scene with light blue marker pen.
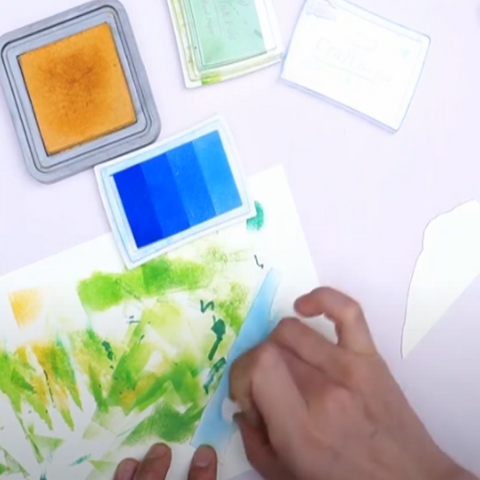
The left two cutting dies were painted with green using ink pads.

Decorate the edges of the two dies with orange colour to create a scene of sun in the sun.

Then adhere the above two mountain to the square paper. After that, the forest pattern can be adhered to the paper.

In order to create the reflection of forest in the lake. Paint the mountain on another paper and adhere to the above paper together.


Then adhere the lake to the middle place of the paper.

Finally, cutting out the extra paper and adhere one brown frame to decorate the project using liquid glue. Now, we can adhere the finished forest scene to the card now!


Do you get little inspiration from the two tutorials? If you have any questions about making cards, please feel free to contact with us by email! We will help you solve problems as soon as possible. Welcome all of you to share nice projects with crafty friends! We will offer you surprising gifts!
Thanks for your reading! Wish you have a good day!
The complete tutorials:
Cycling Cutting Die:
Forest and Moutain Cutting Dies:


Leave a comment